(Post by A.D. Riddle)


Earlier this year, I took my first trip (hopefully of many) to Egypt. Normally I am interested in Bible history and geography, though recently, my attention has been drawn to ordinary, daily-life objects and cultural behaviors. For Bible times and places, it can be a little challenging to come up with photographs that illustrate these sorts of things. But that is why I found Egypt is so amazing.
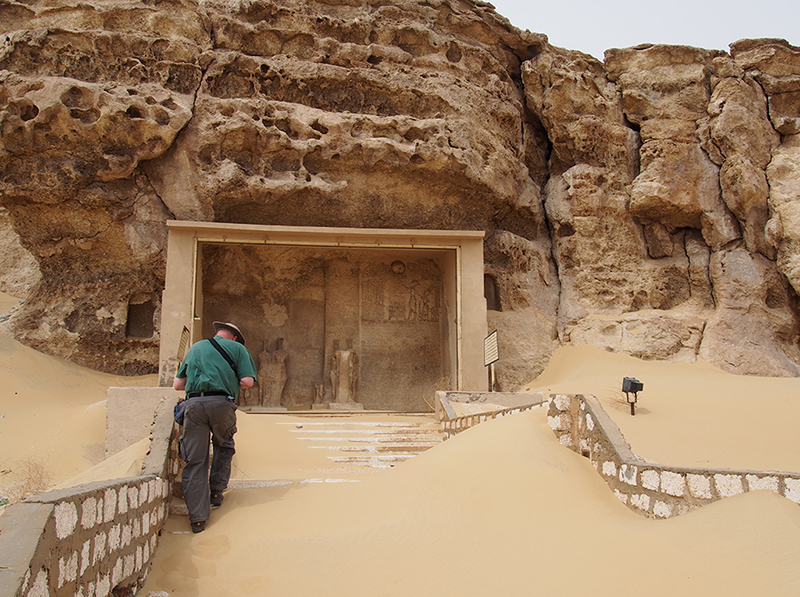
One of BiblePlaces.com‘s photographers on location in Egypt.


Egypt provides three sources for helping us visualize ancient ways of life.

1. Tomb Models.
You can probably find examples of tomb models in most museums with Egyptian collections. These are ancient models that depict people in various occupations, most of them I think dating to the Middle Kingdom. Examples include herding cattle, storing grain, baking, butchering, sailing boats.

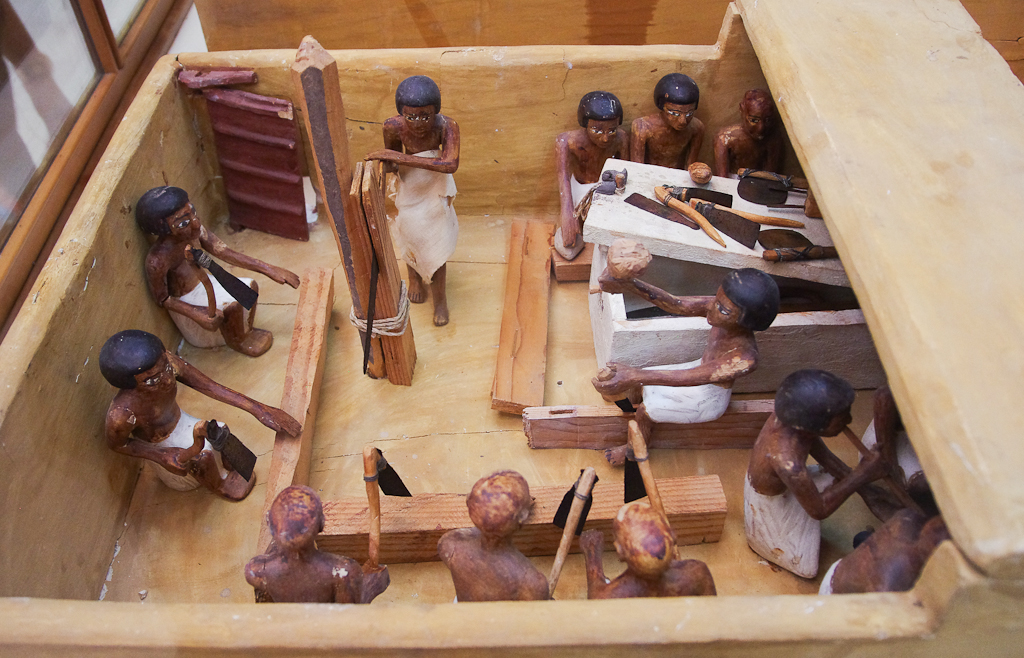
The models were placed in the tombs of nobles and depict the kinds of industries and activities that that particular noble oversaw during his lifetime. This photograph from the Egyptian Museum in Cairo shows carpenters at work. You can see them with their various tools: mallet, adzes, chisels, saw. Some of them are working on a sarcophagus.
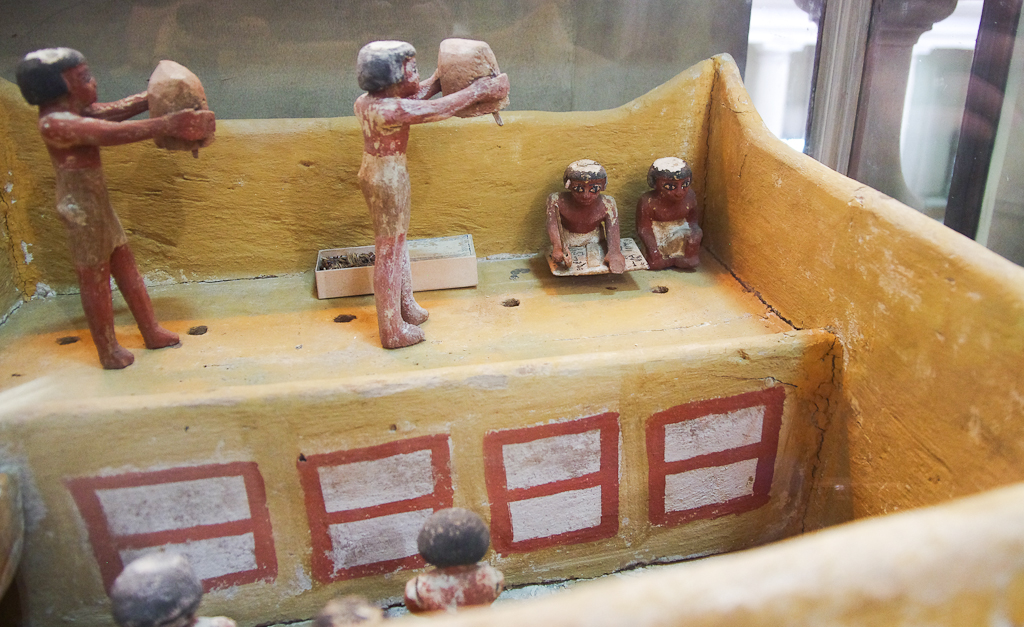
Here is a model granary also from the Egyptian Museum. You can see people carrying sacks of grain to a scribe who is recording the amounts. You can even see the hieratic writing on his tablet. The red and white rectangles below are chambers or bins for storing the grain. (Now re-read Genesis 41:47-49.)
2. Tomb Paintings.
In royal tombs, you can see artwork of the king or members of the royal family interacting with deities, involved in funerary rituals, dealing with their enemies, and receiving tribute. In the tombs of nobles, however, the same sources for the models above, you can find elaborate paintings or reliefs of more mundane activities like cultivating fields, hunting, fishing, helping a cow give birth, and so on.

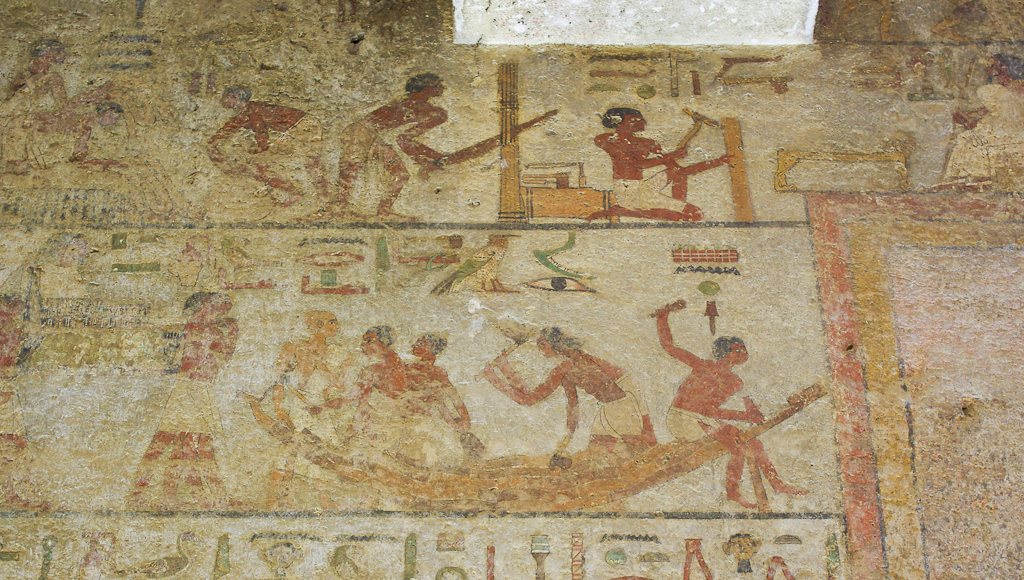
Here is a tomb painting from Beni Hasan that shows carpenters at work on a boat. Again, you can see the tools: axes, mallets, and adzes. Above them some carpenters are building furniture. One man is using a saw and another an adze. Between them are several other woodworking tools.
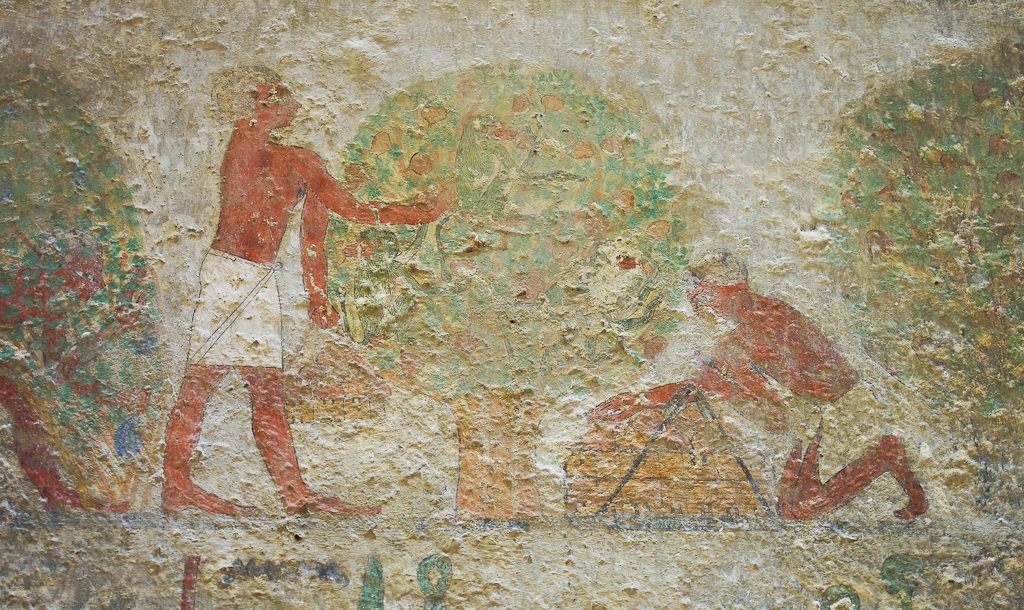
This photo, also from Beni Hasan, shows two men harvesting figs from a tree. There are three monkeys in the tree—apparently also big fans of the fruit. (Need help seeing the monkeys? Click here.)
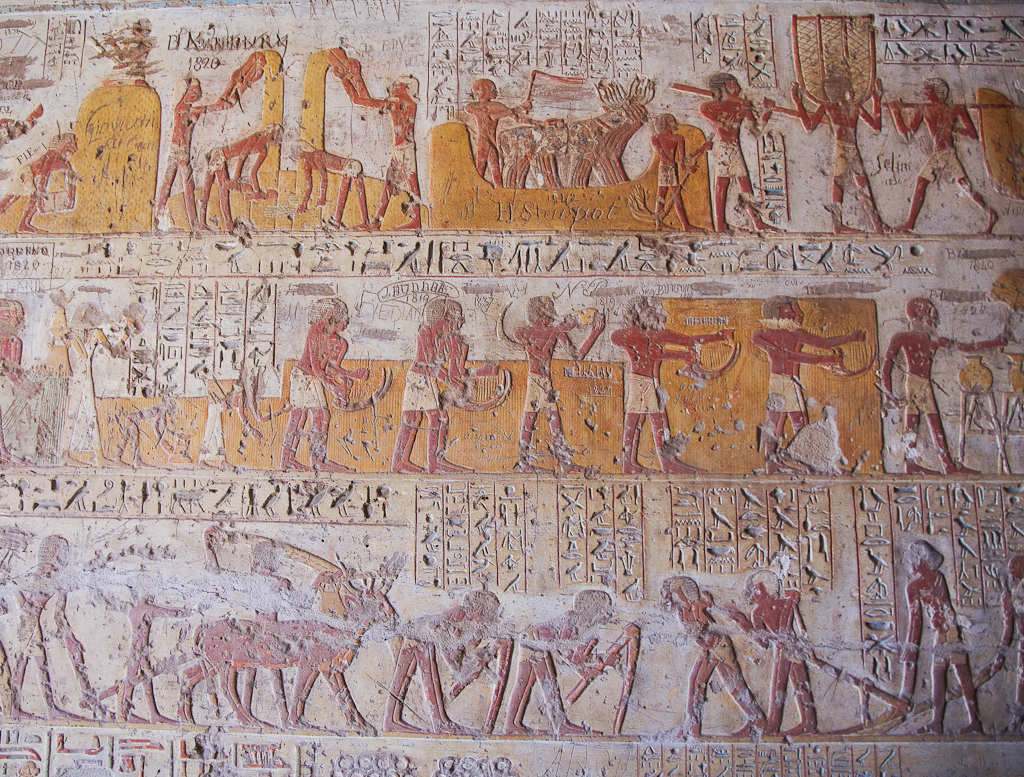
This scene from El-Kab shows the cycle of a grain harvest. In the bottom register, two plows are being pulled, one by oxen and the other by men. In between two men are tilling with hoes. Partially concealed by the oxen a man is sowing seed. In the middle register, men with sickles are reaping the grain. It must be hot work because the man in the center is stopping to drink from a jug. In the top register, they are bringing the grain in baskets to be threshed by oxen, then winnowed by hand. In the top left, a scribe is overseeing the storage of the grain (now shown).
3. The Real Thing.
And if that were not enough, in Egypt you can see the actual objects themselves, thanks to the arid climate and the fact that burials were located in the desert beyond the cultivated land. Many items which are not preserved in other countries—such as textiles, food, wood—can be found in Egypt.

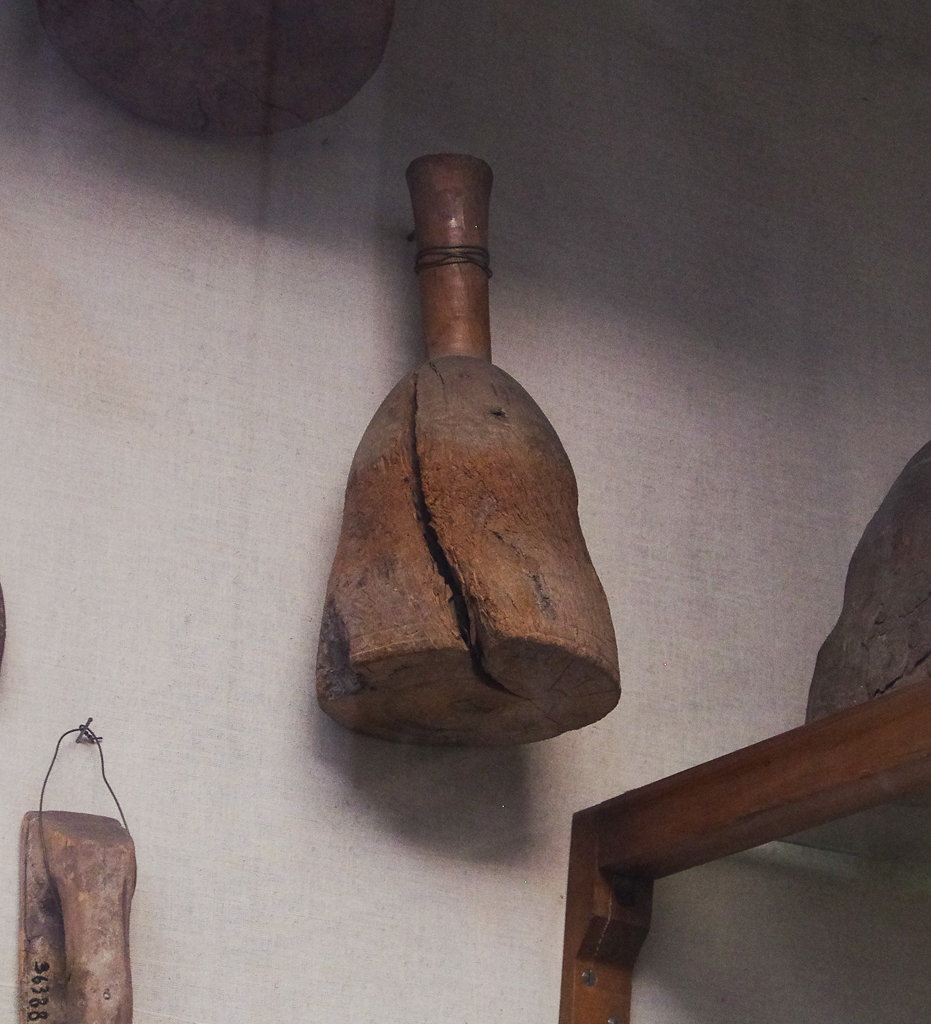
In keeping with the theme of carpentry, here is a wooden mallet.
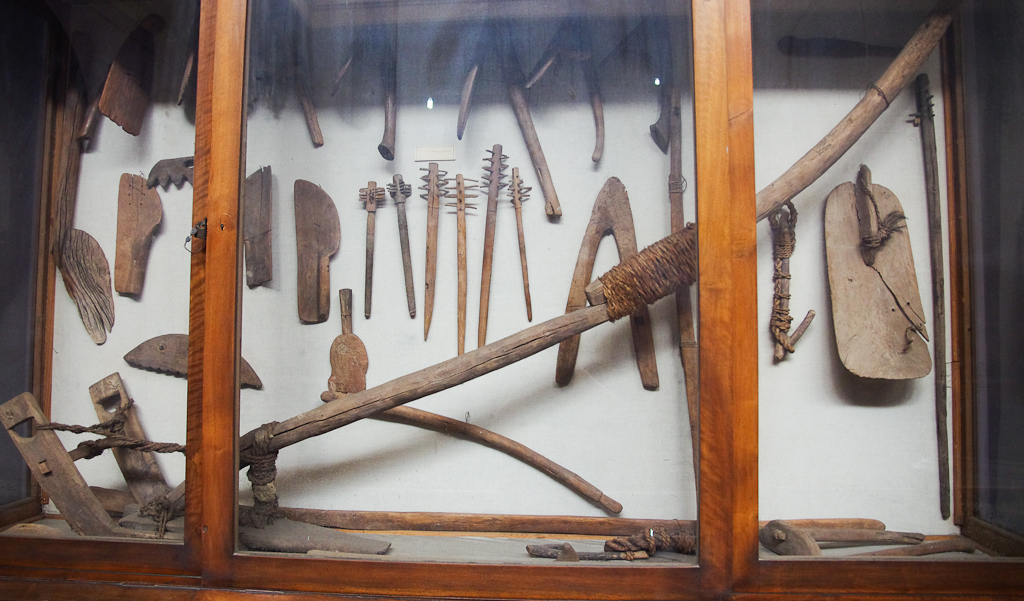
This case in the Egyptian Museum in Cairo shows many of the tools shown above: a wooden plow (with fiber ropes!), hand scoops for winnowing grain, and hoes.
I might also make mention that, although not unique to Egypt, in the rural agricultural villages and fields, you can see traditional methods of farming, herding, butchering, etc. that in many cases do not appear all that different from their ancient counterparts.

UPDATE: Follow-up post “Travel in Egypt.”
Share:
(Post by A.D. Riddle)

At the annual meeting of the Near East Archaeological Society last November, Dan Warner gave an update on the excavation of the Gezer water system. The tunnel seems to date to the Middle Bronze Age: the pottery from the tunnel is Late Bronze and Middle Bronze, and the tunnel’s position vis-à-vis the Canaanite Tower indicates a relationship between the two. The tunnel possesses a number of interesting features which raise questions about its function—was it in fact a water system, or was it something else?

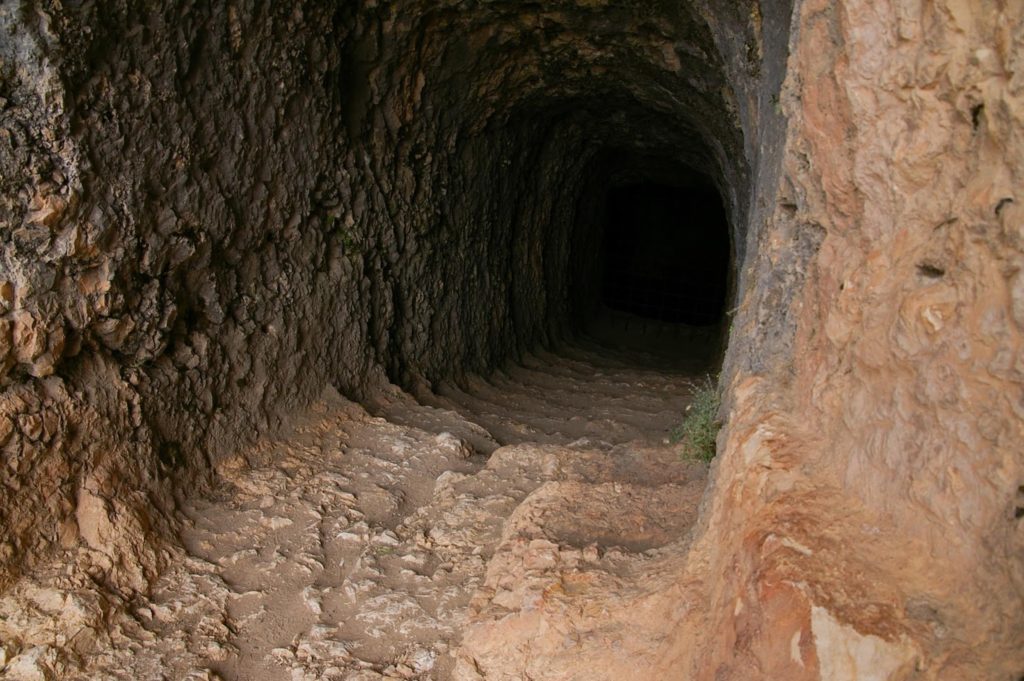
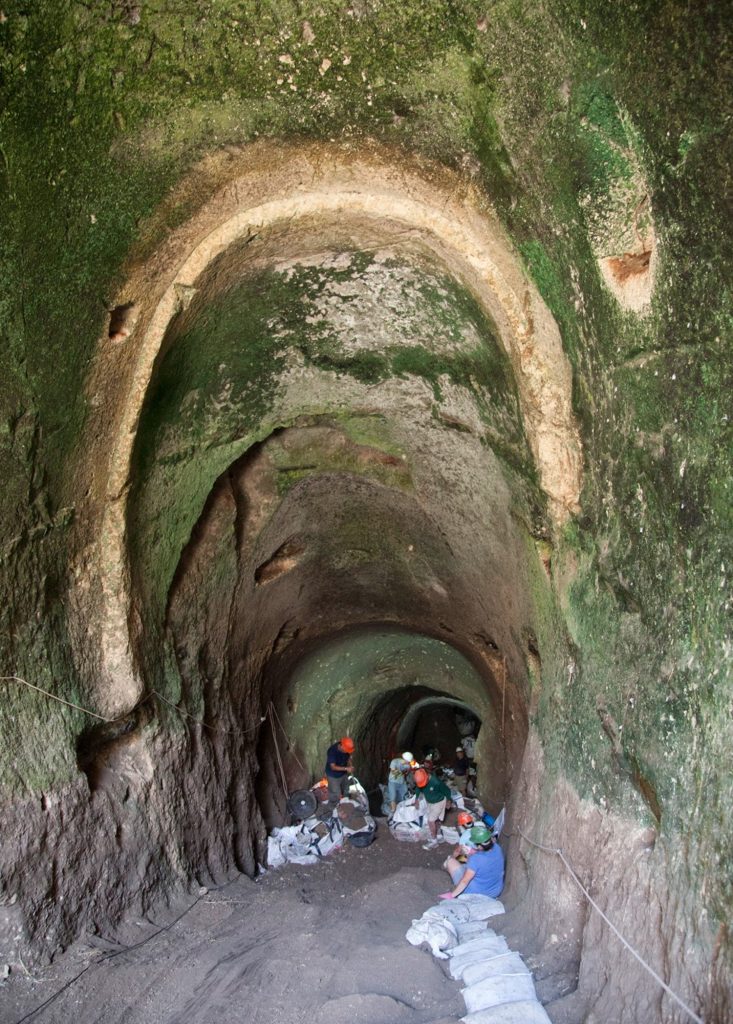
The tunnel descends 150 feet below the surface and has a barrel-shaped ceiling and stairs. There are two carved arches some distance apart, sort of like ribs, that have no real architectural purpose and appear to be ornamental. One of the rib-arches can be seen in the photo below. There are also niches carved into the walls of the upper part of the tunnel, some of them decorated with arches or recessed frames, and one of them with a betyl. Some of the niches can also be seen in the photo below.

 Photo from NOBTS Archaeology Blog.

Dan Warner’s team has now cleared 80 feet beyond the earlier excavation of Macalister. At the base of the tunnel, there is a basin and beyond that a man-made cavern which extends east. According the geologists, the aquifer is 30 meters beneath the cavern, so this is not obviously a water system. If it is a water system, why did they carve niches and arches and a cavern? And why is it so large? Could the tunnel have instead had a different function?

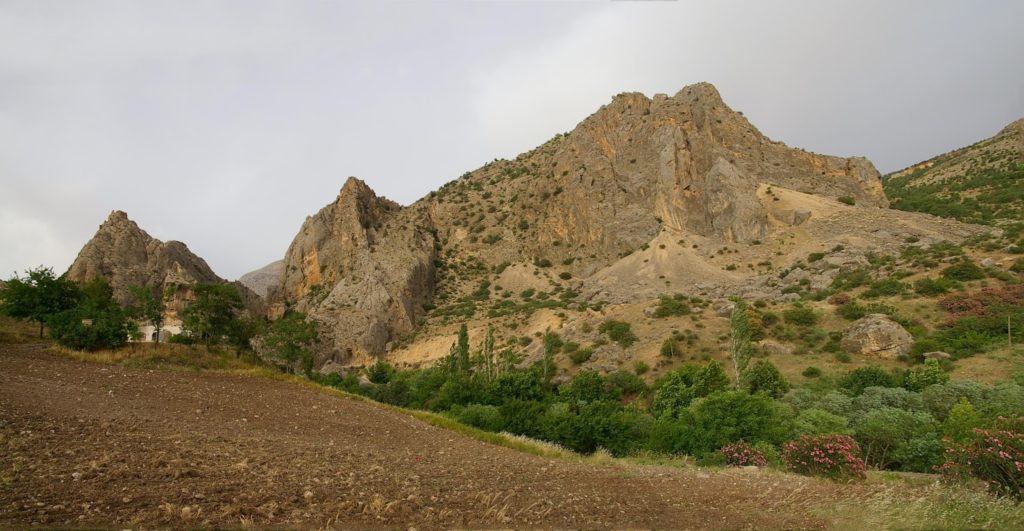
I was struck by some similarities to a cultic tunnel at Arsameia on the Nymphaios River, near the more famous site of Nemrut Dağ in Turkey. Dan Warner did make mention of the cultic use of caves in the Greek world (both in literature and archaeology), so I proceed to note the similarities here even though there is really no apparent geographical or chronological connection between Gezer and Arsameia. Arsameia-on-Nymphaios is a cultic center which occupies the highest elevation in the photo below.  

Arsameia-on-Nymphaios from southwest (from PLBL vol. 9).

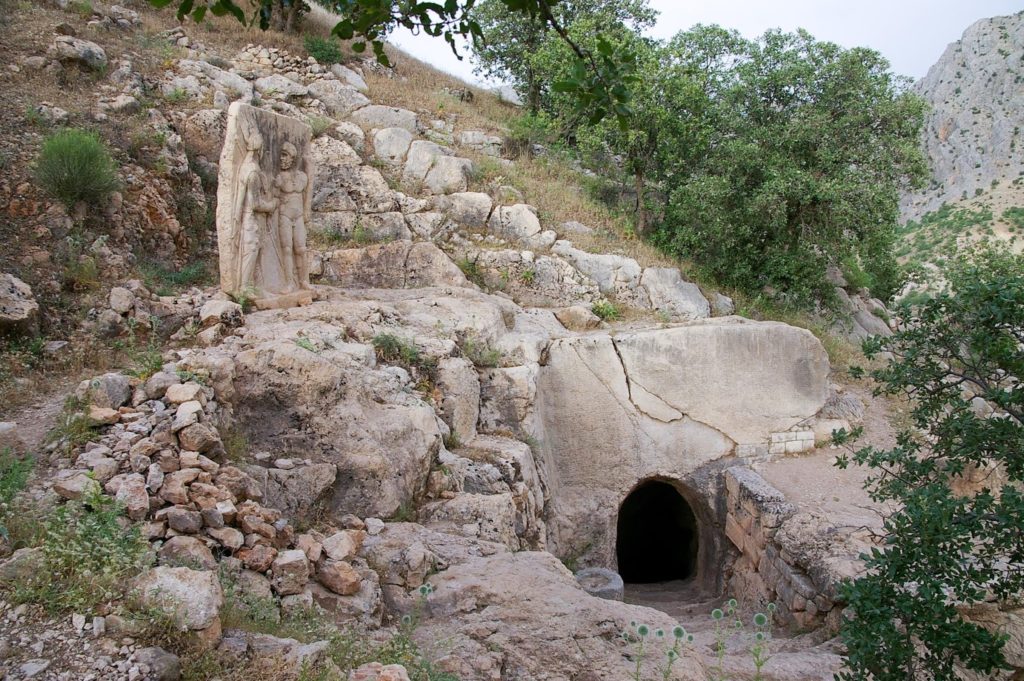
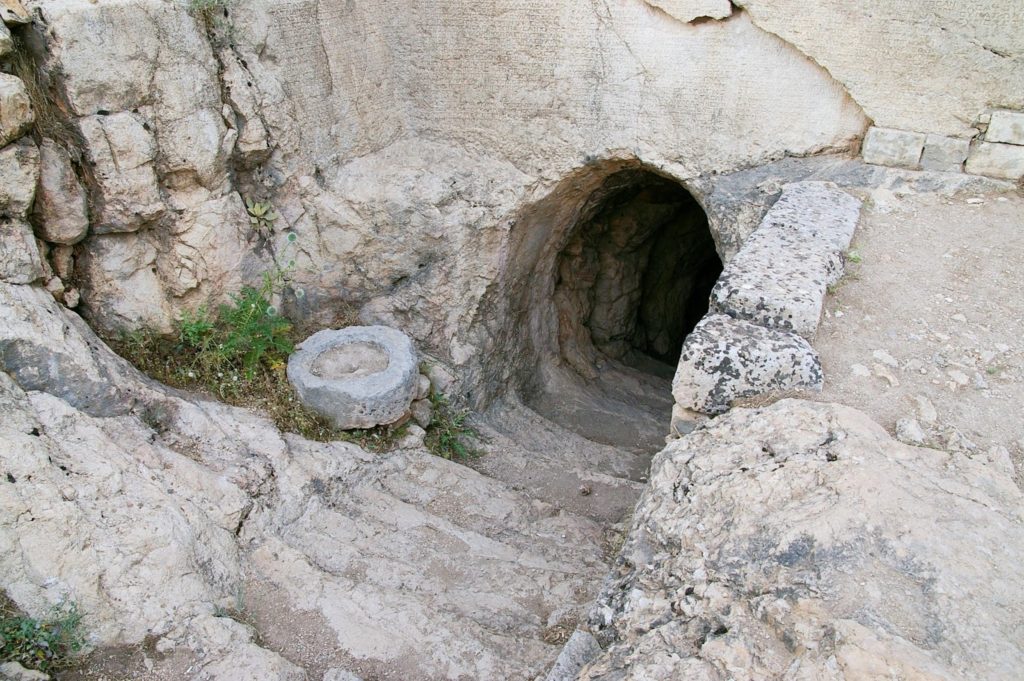
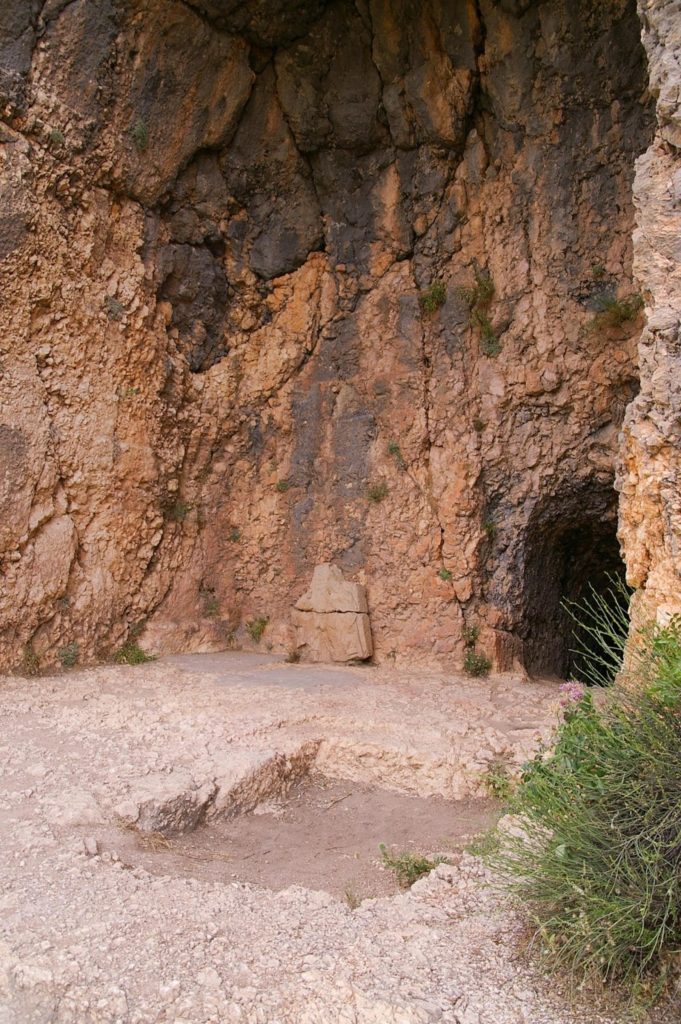
At the site, there is a Great Rock Chamber carved into the mountain, various stelae, and a monumental staircase. But there is also a tunnel which descends diagonally into the mountain. Above the tunnel there is a relief of Heracles (Hercules) and Antiochus I Theos, king of Commagene, and the longest Greek inscription in all of Anatolia. Like Gezer, the tunnel has stairs and a barrel-shaped ceiling. The tunnel is 520 feet long and terminates in a small cavity with no indication of its function.

 Arsameia-on-Nymphaios tunnel entrance with inscription and relief (also from PLBL vol. 9).

Arsameia-on-Nymphaios tunnel entrance with inscription and stairs (also from PLBL vol. 9).


The tunnel at Arsameia-on-Nymphaios is described in Brijder’s new book. He calls it “a mysterious, dark and incredibly long tunnel in rock.”

After such enormous labour and effort it was disappointing that the very long, deep and dark tunnel had not yielded any evidence as to its function. It is clear that it did not lead to a subterranean spring. The suggestion of a water tunnel does not seem to be very convincing either, although it cannot be excluded. Dörner notes: ‘The tremendous effort that went into digging this rock tunnel of Arsameia could only have served a very special purpose, and since the tunnel is situated at a particularly central spot in the cultic area of the hierothesion, the thought of a cultic function of the tunnel simply occurred to me’ (figs. 161–162). According to him, the making of a rock tunnel was not defined by practical intentions, but by religious ones. ‘It seems rather logical to assign the large rock tunnel in Arsameia to the cult sphere of the god Mithras, who is the “God born from the rock.”’ (Brijder 2014: 255)

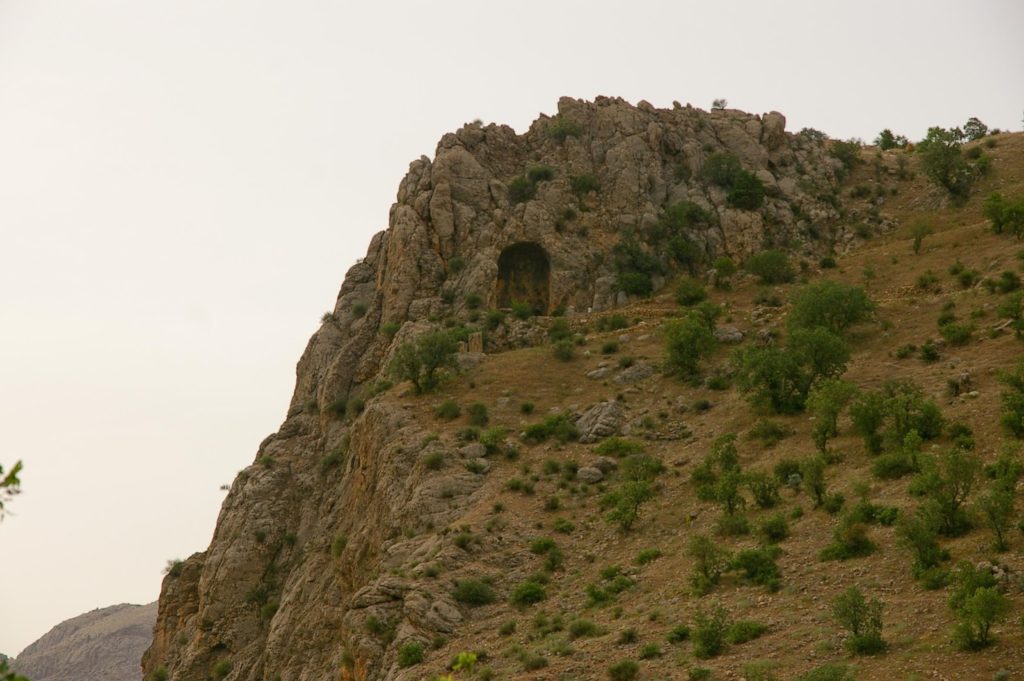
As a side note, the Great Rock Chamber/Hall also has a tunnel with barrel-shaped ceiling and stairs. The tunnel is not nearly as long—only 33 feet. The tunnel leads to a small platform which overlooks a square, 20-foot-deep chamber without any doors or stairs. Again, the function of the tunnel and chamber are unclear, but Brijder inquires whether this could have been intended as a burial chamber and later converted to a cenotaph.

Arsameia-on-Nymphaios Great Rock Chamber from below (PLBL vol. 9).
Arsameia-on-Nymphaios Great Rock Chamber interior with tunnel (PLBL vol. 9).

Arsameia-on-Nymphaios Great Rock Chamber tunnel with steps (PLBL vol. 9).

It will be interesting to see what new developments come from Gezer this summer, and if Dan Warner can come closer to determining the tunnel’s function. An article about last year’s work on Gezer tunnel can be read here, and the excavation website is here.

Brijder, Herman A. G., ed.
2014  Nemrud Dağı: Recent Archaeological Research and Conservation Activities in the Tomb Sanctuary of Mount Nemrud. Berlin: Walter de Gruyter.

Share:
(Post by A.D. Riddle)

Google announced that it would discontinue support and development of the free Picasa program beginning March 15. After this date, it will no longer be possible to download the program. If you already have the program, you will be able to continue using it. The full announcement from Google can be viewed here. If you do not already have a good photo browser, we recommend downloading Picasa before it is gone for good.

I have used Picasa desktop for years. I appreciate Picasa’s search capabilities, the ease and simplicity with which I can tag photos, browse large collections, and sort them. You can read our two-part blog series on how Picasa can be a useful tool for accessing the vast riches of the Pictorial Library of Bible Lands.

Using PLBL with Picasa (Part 1)
Using PLBL with Picasa (Part 2)

Share:
(Post by A.D. Riddle)

Pottery is the most abundant find in any archaeological excavation. Because everyone used pottery in antiquity, because pottery is so fragile and required frequent replacement, and because pottery is impervious to deterioration from environmental conditions, pottery can be found at every ancient site.

At each dig, potsherds are collected, cleaned and examined. Pottery can tell us about a site’s occupation history, it helps us to date the associated strata and structures, and it can reveal such things as relations (trade or otherwise) between sites and regions.

For decades, the standard reference work has been Ruth Amiran’s Ancient Pottery of the Holy Land from Its Beginnings in the Neolithic Period to the End of the Iron Age (New Brunswick: Rutgers University Press, 1970). This volume is quite useful, although, after nearly 50 years, a refresh is needed. Rumors have circulated for some time that an update, to be edited by Seymour Gitin, was being prepared, but the apparent delay led some to wonder secretly whether there was any truth to the rumors.

Yesterday, they were proven true.

The Israel Exploration Society announced the publication of The Ancient Pottery of Israel and Its Neighbors from the Iron Age through the Hellenistic Period. This is a two-volume work, with additional volumes still in preparation that will cover earlier periods. The only place I can find online to order it is here. There is a part of me that would like to describe these volumes as indispensable, but the $240 price tag gives me pause. Here is the publisher’s description and table of contents:

These two volumes offer a comprehensive corpus of ceramic forms and their typological development organized according to period, geographical region, and cultural tradition. The focus of each chapter is on the most characteristic pottery types and decorative motifs selected from a wide range of sites. Unique in scope, this publication presents a wide range of ceramic types accompanied by specially prepared pottery plates and color photos illustrating thousands of forms. A classic reference work, it serves as an essential resource for archaeologists and other scholars and students of ancient Near Eastern studies. Volumes covering the Neolithic and Chalcolithic periods and the Bronze Age are currently in preparation. 

808 pp., 328 plates with 3,393 images; 34 color photos illustrating 277 vessels; hard cover 27.6 x 21cm.


Volume 1
  • Iron Age I: Northern Coastal Plain, Galilee, Samaria, Jezreel Valley, Judah, and Negev, by Amihai Mazar
  • Iron Age I: Philistia, by Trude Dothan and Alexander Zukerman
  • Iron Age I: Transjordan, by Larry G. Herr
  • Iron Age IIA–B: Northern Coastal Plain, by Gunnar Lehmann
  • Iron Age IIA–B: Northern Valleys and Upper Galilee, by Amnon Ben-Tor and Anabel Zarzecki-Peleg
  • Iron Age IIA–B: Samaria, by Ron E. Tappy
  • Iron Age IIA–B: Judah and the Negev, by Ze’ev Herzog and Lily Singer-Avitz
  • Iron Age IIA–B: Philistia, by Seymour Gitin
  • Iron Age IIA–B: Transjordan, by Larry G. Herr
  • Iron Age IIC: Northern Coast, Carmel Coast, Galilee, and Jezreel Valley, by Ayelet Gilboa
  • Iron Age IIC: Samaria, by Ron E. Tappy
  • Iron Age IIC: Judah, by Seymour Gitin
  • Iron Age IIC: Northeastern Negev, by Itzhaq Beit-Arieh and Liora Freud
  • Iron Age IIC: Philistia, by Seymour Gitin
  • Iron Age IIC: Transjordan, by Piotr Bienkowski
Volume 2
  • Iron Age I–II Phoenician Pottery, by Ephraim Stern
  • Iron Age I–II Cypriot Imports and Local Imitations, by Ayelet Gilboa
  • Iron Age I–II: Greek Imports, by Jane C. Waldbaum
  • Iron Age IIC Assyrian-Type Pottery, by Ephraim Stern
  • Iron Age IB–IIC Egyptian and Egyptian-Type Pottery, by Eliezer D. Oren
  • Persian Period, by Ephraim Stern
  • Persian Period Imports, by Renate Rosenthal-Heginbottom
  • Hellenistic Period, by Andrea M. Berlin
  • Hellenistic Period Imported Pottery, by Renate Rosenthal-Heginbottom
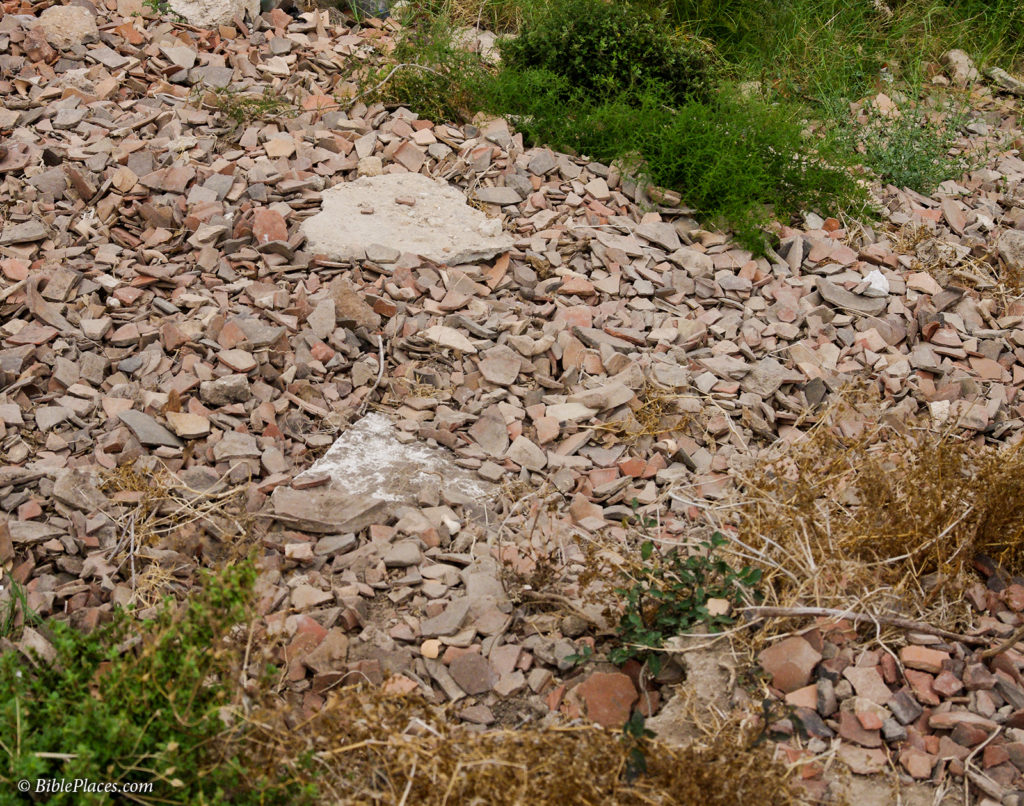
Discarded pottery sherds at Tell Arqa, Lebanon.
HT: Jack Sasson
Share:
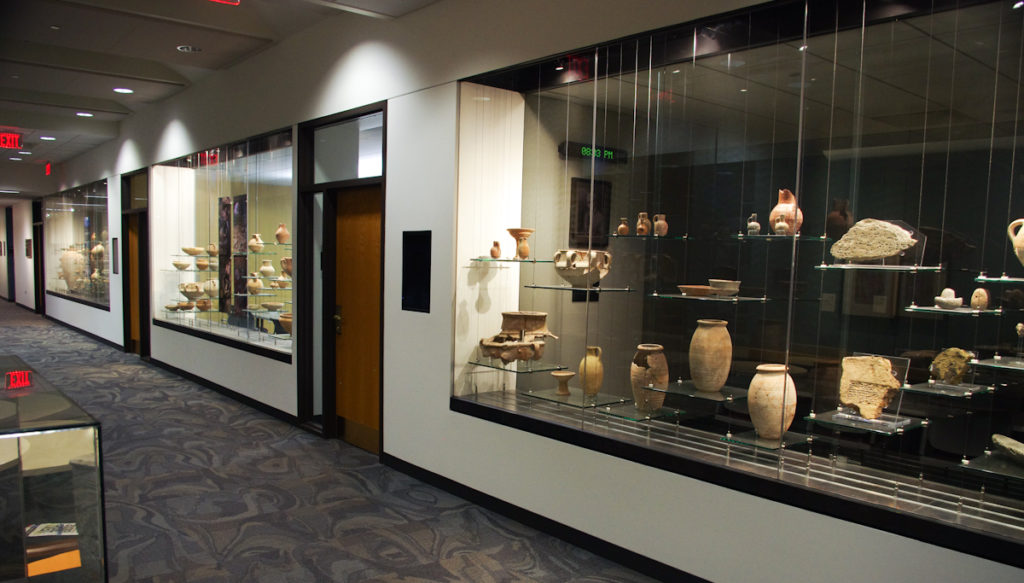
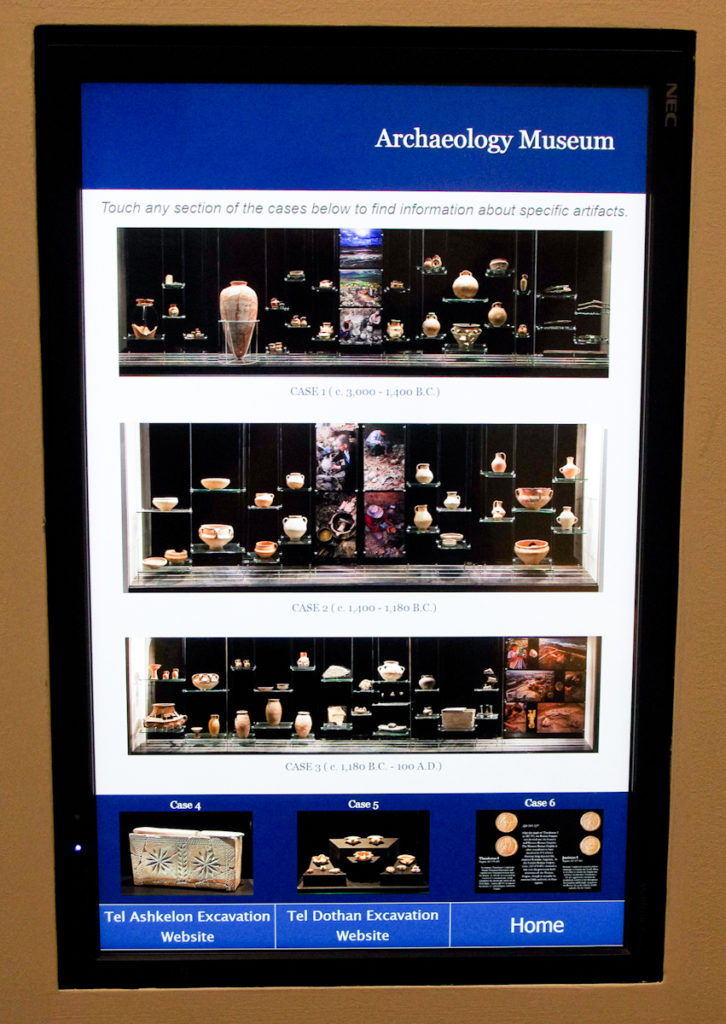
The other evening, I had the opportunity to visit the newly relocated and renovated Wheaton Archaeology Museum. For those who can make a stop, the museum is located on the fifth floor of the Billy Graham Center at Wheaton College. Many of the objects are finds from Tel Dothan, where Wheaton’s Joseph Free conducted excavations between 1953 and 1964.

The main displays consist of three glass cases built into the hallway wall. If there are no classes occupying the rooms, you can view the cases from the other side too. To read descriptions about the objects, there are two touch-screen panels. You tap on the object, and a description appears on the screen. Pretty fancy. Be sure not to miss the three smaller displays with ancient lamps, coins of Roman emperors, and an elaborately carved ossuary.

Share:
(Post by A.D. Riddle)


As a follow-up to Todd’s post on using GPS in Jordan, here are the steps my brother used to turn his iPhone into a navigation system. On a trip to Lebanon two years ago, we were able to use my brother’s iPhone as a GPS. His iPhone is an unlocked GSM (meaning that he could swap out SIM cards—this is important!).

1.    At the airport in Beirut, my brother purchased a SIM card and a T-Mobile 3G+ data plan in Lebanon. For our two-week trip, 2GB of data was sufficient, as long as we avoided using apps such as Google Earth which load image tiles every time you swipe or zoom. This near-constant loading of raster images really gobbles up data.

2a.    While within the city of Beirut, my brother discovered that Apple Maps worked better. (Location Services has to be enabled.) It updated our present location faster and with greater precision than other apps, which was quite important in the city so that we did not miss any turns. The street maps in Apple Maps are vector data, so they loaded quickly. The problem with Apple Maps was that road names were in Arabic, so not easy to read. But, since we knew our destination, and we could see where we were at that moment, we could figure out which roads to take.

2b.    Outside Beirut on the way to the next city, Google Maps worked better. Google Maps did not update our position as quickly, but it did show more of the smaller roads (very helpful!) and was pretty accurate. The street maps in Google Maps are also vector data, so the maps loaded quickly.

2c.    Once we were within a mile or so of whatever obscure site that we were trying to find, my brother used OpenStreetMap within the app GaiaGPS. (GaiaGPS is $20 in the App Store; it works on both iOS and Android phones.)

As Todd did, before leaving on our trip, we located all sites in Google Earth. The Google Earth kml file was converted to a gpx file using the free kml2gpx website. My brother then loaded the gpx file into GaiaGPS. As with Google Maps, OpenStreetMap also showed more of the smaller roads and showed where our Google Earth site was located in relation to our position. Because OpenStreetMap is tile-based, sometimes it took the maps a little longer to load. To get around this, we could cache our route the night before, though sometimes we did not always know exactly which roads we would be using, or we did not cache all the zoom levels that we needed. GaiaGPS was not quite as fast at updating our position as Google Maps, but my brother could force GaiaGPS to update simply by snapping a photo within GaiaGPS. (Since GaiaGPS geotags photos, taking a photo forced GaiaGPS to update our location in order to write the coordinates to the jpg image file.)

3.    We also used GaiaGPS to store waypoints. In essence, this feature kept track of the path we travelled by recording GPS coordinates every few seconds. Once we returned home, we were able to use the waypoints (a gpx file) from GaiaGPS to geotag all my photos using the free COPIKS PhotoMapper. The COPIKS app marries waypoint coordinates with a photograph based on matching timestamps. (It is important beforehand to sync up the date-time on your camera with the date-time on the iPhone.) COPIKS then writes the coordinate data to the jpg image file.

4.    As Todd did in Jordan, we found screen captures from Google Earth to be helpful on several occasions. Rather than printing them, we loaded the images onto an iPad for reference.

Share: